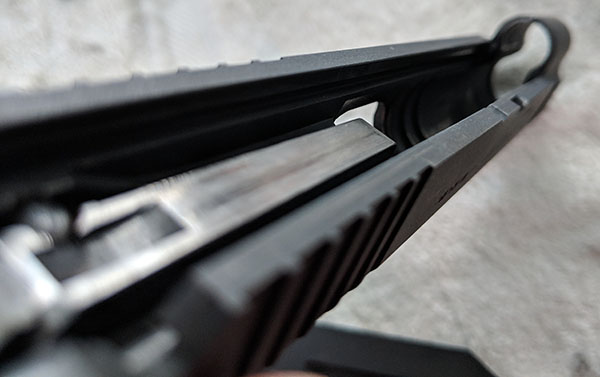
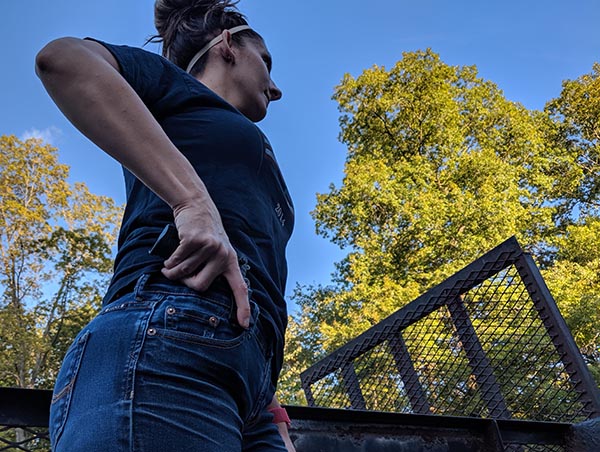
Gun owners often wonder about ways to loosen the slide on their pistol. Sometimes, it’s because it is new and they want to “break in” the slide. Other times, the owner has weak hands and finds racking the slide difficult. Whatever the reason, there are several tips and tricks to help you get over the hurdle of loosening the slide. To make your slide move move more freely, you’ll need to ensure the slide and slide rails are properly cleaned and lubricated. Additionally, you need to exercise the recoil spring which will also help loosen the movement of the slide. Finally, you can try alternate techniques for racking a round to ease the difficulty for those with weak hands.
Table of Contents
Common Problems With Difficult Slides
The stiffness of the slide can generally be attributed to one of two factors. First, the slide is not properly lubricated or is partially obstructed, and the friction between the slide and frame is preventing movement. On new pistols, small burrs (or variations in the metal) on the slide or slide rail could be creating points where your slide sticks preventing you from pulling the slide back completely. Second, the slide spring is stiff and simply needs to be “broken in” to loosen up the action of the slide. Depending on which problem you face, the solutions will vary.
Decreasing Friction on the Slide With Lubricant
The easiest way to reduce friction, is a lubricant. For example, my friend brings a bottle of CLP (you can get on Amazon pretty cheap) with him to the range to help smooth the action of his slide and trigger. Gun lube like CLP also has the added benefit of reducing dirt, sand, and other contaminants that may stiffen up the action of your slide.
To use a lubricant, simply squeeze a small amount onto the slide and slide rails. Rigorously rack the slide to help spread the lubricant across the entirety of the surface. Do not apply liberally, as this can contaminate any rounds you place into the weapon. I find it best to keep a rag on hand to wipe up any excess gun lube.
Reduce Friction Using A Cleaning or Polishing Agent
If gun oil doesn’t help loosen the slide, try wiping off the oil and using a cleaning product to remove buildup or minor imperfections on the slide and slide rails. I recommend the Flitz Metal Polish and Fiberglass Cleaner (Amazon link). While this cleaner is a bit on the expensive side, it should drastically improve and smooth out the action of the slide.
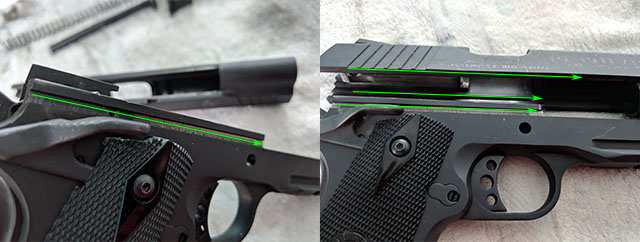
Application is easiest when the weapon has been field stripped. This process allows you to remove the recoil spring so you aren’t fighting the tension of the spring on the slide. Additionally, you can match up the rail on the slide with the rails on the frame and see where there is excess friction that could be causing the slide to drag or bind.
Ultimately, you’ll want the slide to glide across the rails without catching or rubbing. Once you’ve done this, any problems you experience are likely the result of the recoil spring, rather than the slide itself.
Decrease Friction By Deburring
If neither of the above methods assist in loosening up your slide, then you may have issues with burrs on the slide and/or slide rails. Only in extreme cases where the slide fails to return home do I recommend this method. You’ll need a deburring tool, and will need to have the weapon field stripped. Once the pistol is stripped, run your deburring tool along the edge of your slide and guide rails to make sure there aren’t any burrs that are impeding the operation of the slide.
Use caution, because you can dig into the guide rails or slide and cause more harm than good. Uniformly apply pressure across the surface to remove any unwanted metal pieces that could be obstructing the slide.
Wipe down the rails and slide with a thick cloth to prevent getting metal splinters in your hand. Next, apply a layer of cleaning/polishing agent to remove any remnants from the deburring. Finally, apply some lubricant and check the operation of your slide. If the thought of deburring makes you uncomfortable, just take it to a gunsmith for inspection.
Loosening The Slide On Your Gun
If you’ve tried both of the above options, and you still can’t easily rack a round, you may have different issues. First, it could be that the slide isn’t moving easily because the spring is too stiff. There are several methods you can use to try and loosen that slide of yours. Newer weapons often come from the factory with excess lubricant (grease) and the problem lies with a fresh spring that hasn’t been broken in. Racking the slide in this condition can be difficult for the new gun owner, or someone with weak grip.
Lock The Slide Back
So the first method you’ll come across for making a slide more loose, is to lock the slide with the action open. I’m not a big fan of this method. Check out my article on rotating everyday carry ammunition. I explain that the repeated compression and expansion of a magazine spring is what will cause it to wear. Therefore, only actions that compress the recoil spring then allow it to decompress will loosen your slide. You’re certainly welcome to try this method of break in, but I have doubts about your success.
Rack The Slide Repeatedly
Another method for loosening the slide on your pistol is to repeatedly rack the slide with significant force. There are several techniques for racking the slide that I’ll cover in a “Techniques For Racking The Slide” section. This method simulates the stresses that your slide will be under while firing the weapon live. While nothing is an exact copy of what your weapon goes through in a cycle, this method to loosen the slide comes pretty close. If you have the grip strength to rack the slide with the weapon intact, I highly recommend it.
Isolate the Spring
For those with a weak grip, racking the slide can be difficult, particularly if the spring isn’t broken in. As I stated above, racking the slide repeatedly provides the most similar conditions to live fire. However, if you can’t rack the round consistently, then repeated racking of the slide may not be possible. Instead, you can field strip the weapon and isolate the spring. Sometimes, the guide rod and spring are integrated. Other times, the spring is separated from the guide rod.
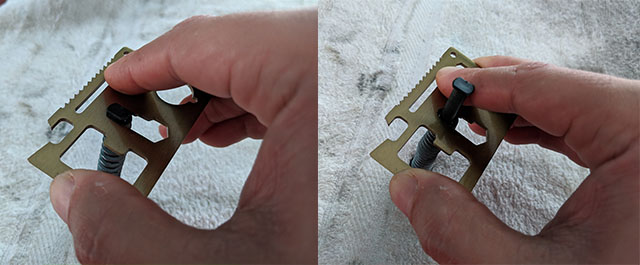
If your guide rod is connected to the spring, you can use a washer with a notch, or other wide flat object, and wedge above the spring. This will provide you a surface to apply pressure downward. In the shot below I am using my wallet multitool (Amazon link) to demonstrate on my Sig P250 recoil spring and guide rod.
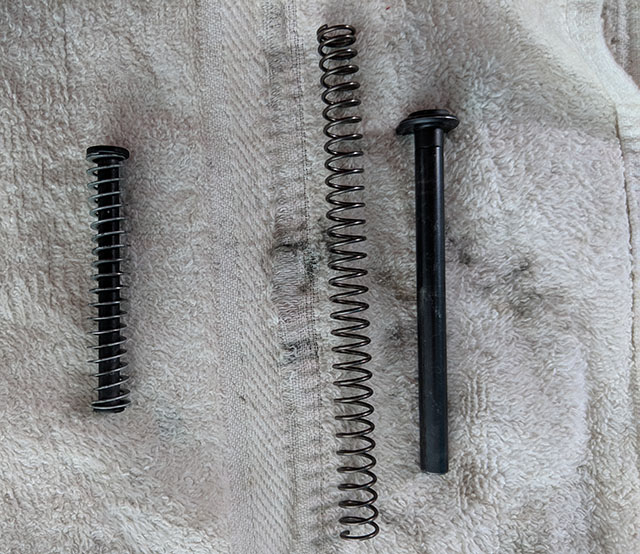
When the spring is separate, I still recommend using the guide rod, to prevent the spring from buckling sideways when pressure is applied. Once field stripped, simply wrap your hand around the entire spring, and push downward. Below is how the spring looks compressed and uncompressed for my Taurus 1911.
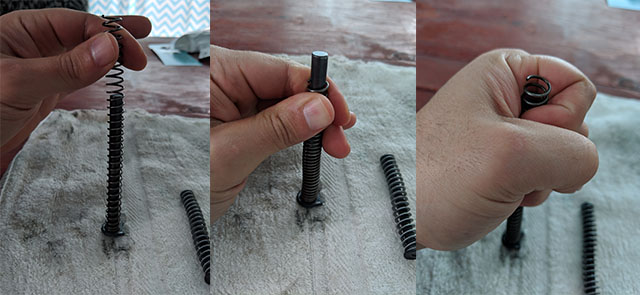
I was able to take these shots on my phone which means I compressed the spring with one hand and a table. You’ll want to fully compress and decompress the spring several hundred times. While this sounds like a lot, it can be accomplished in about 10 minutes at a far cheaper rate than shooting several hundred rounds.
Fire The Weapon
All of the above methods pale in comparison to actually firing your pistol in order to loosen the slide. Running a few hundred rounds through the weapon has no equal when it comes to breaking in the spring. Furthermore firing rounds will help mate up parts that are otherwise to tightly fit together. They will wear down in the necessary spots allowing for smooth movement of the slide. Obviously, this method is not the most cost effective way to loosen the slide. If you’re trying to loosen your pistol slide or break in your recoil spring on a budget, then the above methods are probably what you want to try first.
Techniques For Racking The Slide
Racking the slide is the action that chambers a round. Often those with weak hands will struggle to pull the slide back with sufficient force to allow a round to enter the chamber. Essentially, there are two different grips that you can use on the slide in order to rack a round. Learning the most effective method for your grip strength, and comfort will help ease the process of loosening the slide on your pistol.
Overhand Grip Method
The most common method used when to rack the slide is the overhand grip. Oftentimes, this is the source of many new shooters angst over loading a round into the chamber. Because your hand will be placed over the top of the slide (hence the name “overhand grip”), your thumb will be pointed toward the rear of the pistol.
Below are the steps for using the overhand grip method of racking the slide. Remember to always keep the pistol pointed in a safe direction. For additional firearm safety reminders, check out this article.
Before anyone makes any comments about my neighbors trigger discipline, this weapon was cleared prior to demonstration. I only noticed after the first series of photos that her habits were not a demonstration of safe operation.
Overhand Grip Procedure
Step 1: Grab the pistol grip firmly with your dominant hand. Ensure that your trigger finger is not resting on the trigger. Place it either on the trigger guard or on the frame of the weapon. Keep the pistol upright, magazine well pointed down and muzzle pointed downrange.
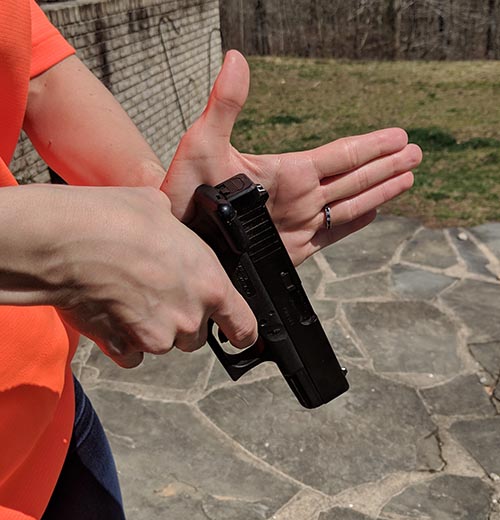
Step 2: Take your non-dominant hand, and press the heel of your palm against the slide. It should be positioned at the rear of the weapon, behind the port where the round is ejected.
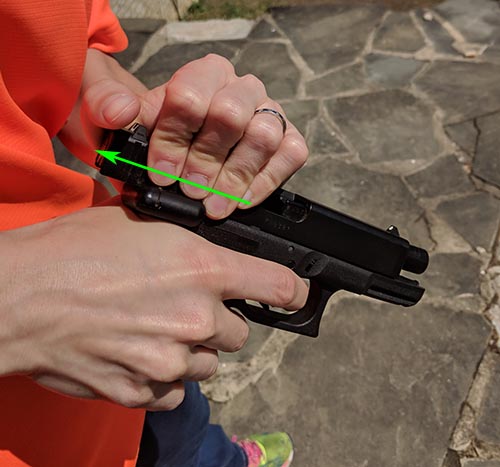
Note: You can place your hand elsewhere on the slide if it is more comfortable. My neighbors wife actually grips the front of the slide closer to the front sight post, as seen in the image below. Just make sure your fingers are clear of the ejection port. She lifts her index finger to prevent the slide from pinching her skin.
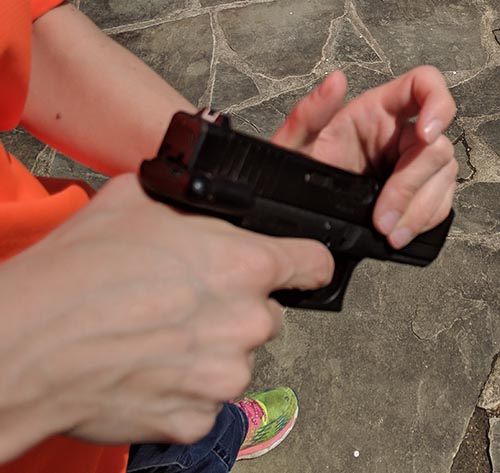
Step 3: Wrap the fingers of the non-dominant hand over the top of the slide. Many modern handguns have grooves on the slide to assist with grip, and this is where your fingertips will land. As a result, your fingertips and heel of your palm will create a vice, to grip the slide.
Step 4: While keeping your dominant hand and forearm stiff, pull back on the slide with your non-dominant hand. Once you’ve pulled the slide completely back, return it to the forward position while gripping the slide. Alternatively, you can release the slide and the recoil spring should return it to the forward position.
Thumb Forward Grip Method
If you struggle with grip strength, then I highly recommend you try the thumb forward grip method. This method of racking the slide allows for better leverage, and uses the force of your entire arm to fight the tension of the recoil spring. Furthermore, there are several variations of this method which allows the shooter to adapt a grip that suits their needs, rather than conform to a rigid method.
Step 1: Firmly grab the pistol grip with your dominant hand. Exercise trigger discipline, and keep your finger off the trigger. Tilt the weapon at roughly a 45 degree angle, so the magazine well is no longer perpendicular with the floor. Keep the muzzle pointed downrange.
Note: Play with the angle of the pistol until you find what is most comfortable for step 2.
Step 2: Take your non-dominant hand place your thumb along the slide, so that the tip is behind the cartridge ejection port. Wrap your fingers over the top of the slide. Pinch with your fingers as if you were holding a pair of pliers.
Note: Adjust your non-dominant hand in various positions until you find one that works. You can grip the slide further back using more of the fingertip of your thumb. Alternately, move the thumb more forward and cover more area of the pistol slide with the whole thumb. Both methods are pictured below.
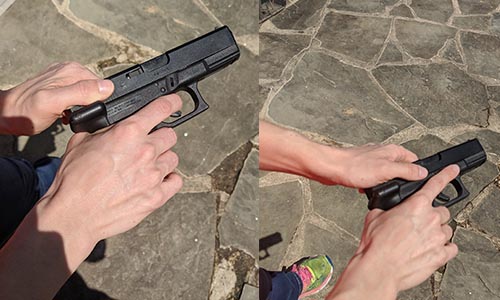
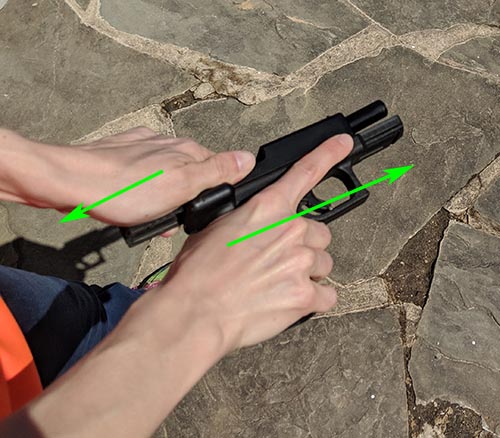
Step 3: Use your dominant hand to push forward on the grip. Simultaneously, use your non-dominant hand to pull rearward on the slide. Alternatively, grip the slide firmly and attempt to hold it in place while your dominant hand is moving forward.
Step 4: Release the slide, or return it to the forward position.
Parting Shots
Loosening up the slide is relatively easy. Once you’ve figured out your method for racking the slide back, it’s just a matter of fine tuning your pistol. Use gun lube, gun cleaner, and elbow grease to help loosen up that slide and break in that stubborn recoil spring. If you’re having difficulty at first, keep at it. Chances are you just need a little time and practice to master racking the slide. Are there any tips or tricks you’ve found that help loosen the slide? Leave a comment below to share with others.
Finally, a special thanks to my neighbors Cari and Andrew for lending me their assistance on this particular article.
